

The scripts usage
Using forms, you can extract data only from simple structure models. You can use scripts to retrieve the model from almost any format. Everything depends on your experience and your ability to analyze information. Model Researcher uses version 3 of Python as the scripting language. This is a simple but powerful programming language with dynamic typing, automatic memory management, and easy high-level data structures.
Writing scripts is not difficult. Even if you are not familiar with any programming language, you can learn how to write simple scripts in a few hours. The article describes in detail the process of reading data and extracting a model using scripts.
About Python
Below you will find almost all types of data that will be used later. On the official website of the programming language, a tutorial is available, where you can learn more about the language.
# Numeric types
a = 5 # int
b = 2.7 # float
c = 0x15 # int, number 21 in hexadecimal notation

# Strings and bytes
d = "Hello, Python!" # string
e = b"\xf5\xa5\x88" # bytes

# Tuples, lists, wordindexes
f = [5, "test", 6.5, (1,8)] # list
g = (1, 2.5, "3", 0x45, 5) # tuple
h = {7 : 47, 9 : (14)} # dict
Lists are similar to arrays in other programming languages with the only difference that lists may contain elements of different types of data. The main difference between tuples and lists is that tuples can not be changed (that is, read-only accesses). At the same time the tuples take up less memory and are created more quickly. Below there is a simple example of working with lists
# Create the list
a = [10, 8, 26, 41, 15]
# The variable b is placed with the element with the index 3 - the number 41 (indexing starts with 0)
b = a[3]
# Adding the number 98
a.append(98)
# The variable l is the length of the list
l = len(a)
Wordindexes are an unsorted collection of items that are accessed by the key (each wordindex key corresponds to a specific value).
# Create empty wordindex
a = {}
# Assign key 1 to value 55
a[1] = 55
# Assign key "red" to value (255,0,0)
a["red"] = (255,0,0)
# Variable v is placed with the value 55, referring to the wordindex by the key 1
v = a[1]
# Filling the wordindex at initialization
b = {1 : 87, "green" : (0,255,0)}
Python does not contain operator brackets (begin..end in pascal or {..} in C), instead of it the blocks are indented, and the input to the block is made by a colon. Below there are examples of the syntax of condition statements and loops.
# A simple example. Type "True" if the variable a> 5, otherwise it will display "False"
a = 10
if a > 5:
    print("True")
else:
    print("False")
Loops in Python. Loops are used in cases when we need to do something many times. You will often have to perform some operation (or a series of operations) in the data part over and over again. For example, read 1000 vertices from the file.
Loop "while" allows you to perform the same sequence of actions as long as the test condition is true.
# Loop "while" will take 5 iterations
с = 0
while c < 5:
    c += 1
The "for" loop in Python has the ability to loop over elements of any complex data type (such as a string or a list).
# The for loop will sort out and display all elements of the list k
k = [1, ”hello”, 5.9]
for i in k:
    print(i)
You can use the range() function as the iterated object to repeat a "for" loop for a given number of times.
# The "for" loop displays a sequence of numbers from 0 to 15, performing 16 iterations
for i in range(16):
    print(i)
You will almost always use the "for" loop to read the data from the file (vertices, faces, and so on).
Building a shape
Let's move on to practice. To get a better understanding of the work of scripts and the Python language, we'll try to use program for other purposes – we will build a simple shape in 3D space, let it be a plane. What prevents us from setting our data, not reading it from the file? That's right, nothing prevents us from it.
All the API functions that allow you to interact with the program are in the mrp module, so we'll start each script with connecting this module.
import mrp
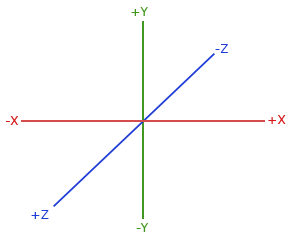
The next thing we need is to specify the data of vertices and faces. Note that OpenGL uses the right coordinate system. This basically indicates that the positive X-axis is directed to the right of you, the positive Y-axis is directed up, and the positive Z-axis is directed to you (that is, back).
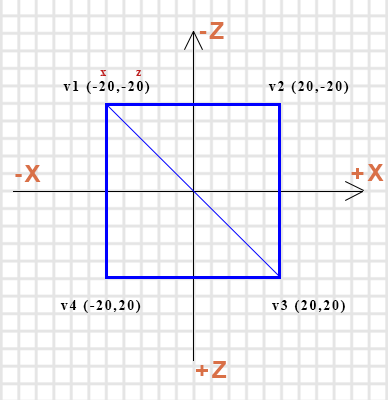
The plane we're going to build is presented below. In the program, we can use only triangular faces, so we draw a square plane of two triangular planes.
Scripts for the program can be written in a separate editor, and in the program itself in the built-in editor, which is available in the Script tab. If you use third-party editors, you can open the script in the program by clicking on the folder icon.
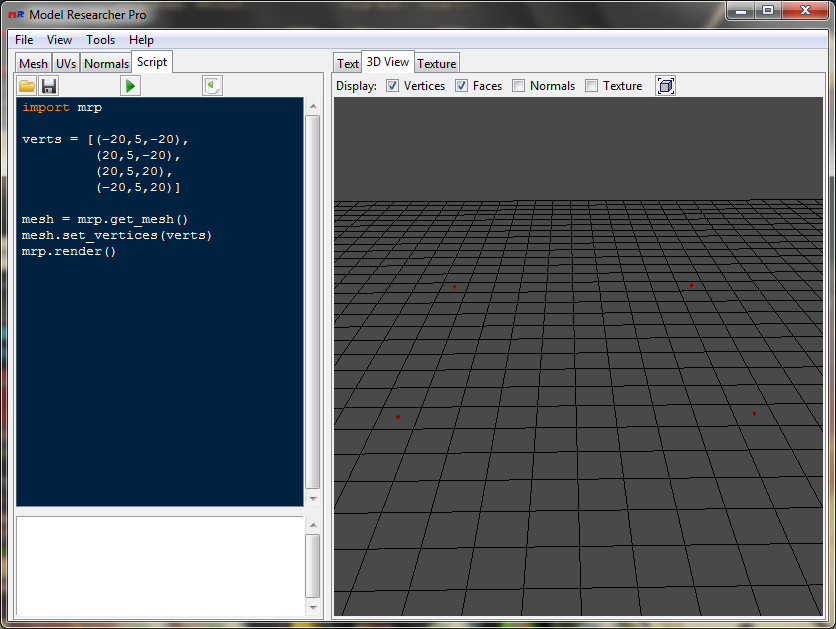
Run the program and go to the Script tab. We need to connect the MRP module and to specify the data to create the plane. We will store vertices and faces in lists, and each face and vertex will be represented by a tuple (x, y, z). The coordinate Y, which is responsible for the height, will be set everywhere to 5. Thus, the first vertex will look like this: (-20, 5, -20). Let's add the mrp module connection and initialize the verts list containing 4 vertices.
You can try to run the script by clicking the button with the green arrow or F5 on the keyboard, but we will not see any result. Now we need to transfer our list with the vertices to the mesh, and then render the mesh itself. This is where the mrp module will help us. To get a mesh object, we'll use the get_mesh() function from the mrp module. This function takes one argument – the name of the mesh whose object you want to retrieve. The root mesh name is "Root" by default. To create a plane, one mesh is enough, so we call the function without specifying a name, and assign the retrieved mesh object to the variable mesh.
mesh = mrp.get_mesh()
So, now in the variable mesh we have a Mesh object with the name "Root" (or rather, a reference
to it), which we can change. It does not contain any data yet. We'll fix
it.
The Mesh object has its own methods, by which it can be
changed. Use the set_vertices() method to set the
vertices. This method has several arguments, but at this stage we are only
interested in the very first – vertices. This is the
argument that will pass our list with vertices.
mesh.set_vertices(verts)
For rendering, the render() function of the mrp module is used. As the only mesh argument, it takes the name of the mesh which is to be rendered. You can also pass a tuple or list of mesh names to display multiple objects. This method also has the root mesh name set by default, so in this case you can call the method without specifying the name.
mrp.render()
After you run the script, four vertices should appear at the 3D View tab.
The next step is to create a list of faces and pass it to mesh. Each face forms a tuple with three numbers – the indices of vertices. Our plane consists of two faces, indexing of vertices starts at zero. Let the first face be with indices 2, 1, 0, then the second will have indices 0, 3, 2.
faces = [(2,1,0),
         (0,3,2)]
To pass a list of faces in a Mesh object, use the set_faces() method. It is very similar to the method with which help we passed the vertices. Our list is passed by the first argument.
mesh.set_faces(fcaes)
Run the script.

Well done! Our plane is displayed in 3D space.
Now let's try to set up each face to its own color. To do this, you need to set the material for each face. To create a material in the mrp module, use the create_material() function . It takes one argument – the name of the material (by default it is set to "Default"), but retrieves a material object. Let's create two materials and set them to red and green colors.
mat1 = mrp.create_material("Mat1")
mat1.set_color(255, 0, 0) # red
mat2 = mrp.create_material("Mat2")
mat2.set_color(0,255,0) # green
Now you need to create a wordindex, in which the key is the face index, and the value is the material object. The first face is red, and the other one is green.
mats = {0 : mat1, 1 : mat2}
To assign these materials to mesh, you need to use the set_material_faces() method, which, as a single argument, accepts the wordindex.
mesh.set_material_faces(mats)
Let's run the script.
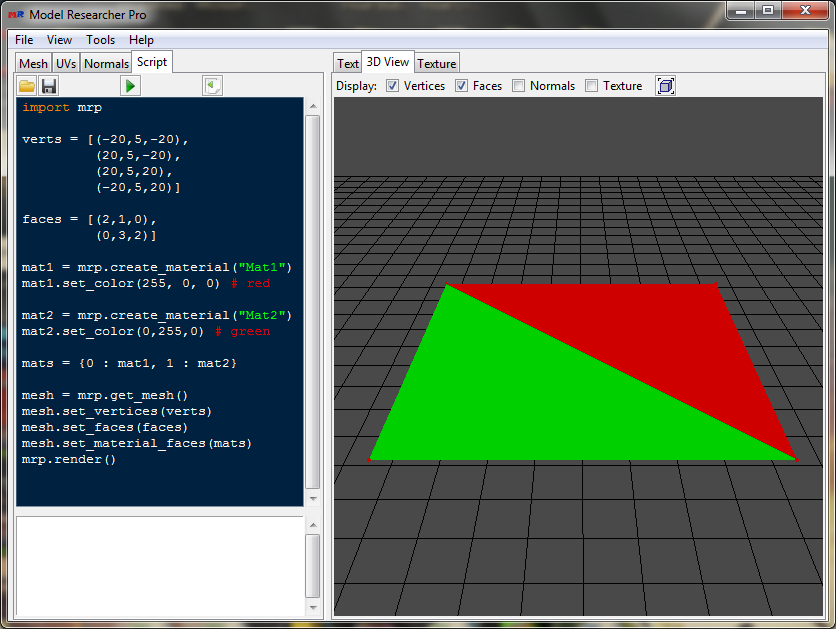
Well done, everything is working! We got a plane consisting of two faces. For each face, we set the material with the specified color.
As it has already been mentioned, in this case we did not use the program for its intended purpose, because, as a rule, we build the model on the basis of the data read from the file. Let's do this.
Building a model
Let's open the cow model from the past tutorial and using Python script we
try to read the data and then render the model.
Download a model

Using the function mrp.get_bfile (), you can get a BufferFile object that contains the stream of the file open in the program and useful methods for reading it (such as readFloat (), read3Short, etc.). This function takes the only byte_order argument, which is the order in which the bytes are read. By default the argument has the value "<", which corresponds to the reverse order (Little Endian). So, in the first lines of code we connect the module mrp and put the object BufferFile into the variable f. We also need to initialize two empty lists for the vertices and faces.
import mrp

f = mrp.get_bfile()
verts = []
faces = []
Now we analyze the values in the form. The vertex data in the file is read with the 98241 offset. The number of these vertices is 664. Data Type is Float, XZY vertex format. There are no indents. The first thing to do is go to the offset in the file, that is, to move the pointer to the offset from which the vertex data starts. You can do this using the seek() method. The first argument is the offset itself, and the second indicates where the move should be from (it is 0 by default - from the beginning of the file - it is what we need).
f.seek(98241)
The vertex data type is Float, which means, that there are 3 numbers at the same vertex of a 4-byte size. The Bufferfile object has a readFloat() method to read numbers of this type. It will read 4 bytes and return a floating point number. We need to read 3 of those numbers. Note that the pointer moves automatically when you read it.
x = f.readFloat()
y = f.readFloat()
z = f.readFloat()
To read 664 vertices, use a "for" loop with the range() function. After reading each vertex, we will add it to the list of vertices. You can do this with the standard append method, passing the tuple by the argument (x, y, z).
for i in range(664):
    x = f.readFloat()
    y = f.readFloat()
    z = f.readFloat()
    verts.append( (x,y,z) )
This code will read 664 vertices from the file, and each will be added to the verts list. This piece of code can be shortened. There is a read3Float() method in the BufferFile object, that reads 3 numbers of Float type and returns a tuple with them.
for i in range(664):
    v = f.read3Float()
    verts.append( v )
And even this code can be shortened by removing the variable v.
for i in range(664):
    verts.append( f.read3Float() )
Append returns the return value of the read3Float() method – a tuple with three read values.
Let's render the vertices by adding the following lines.
mesh = mrp.get_mesh()
mesh.set_vertices(verts)
mrp.render()
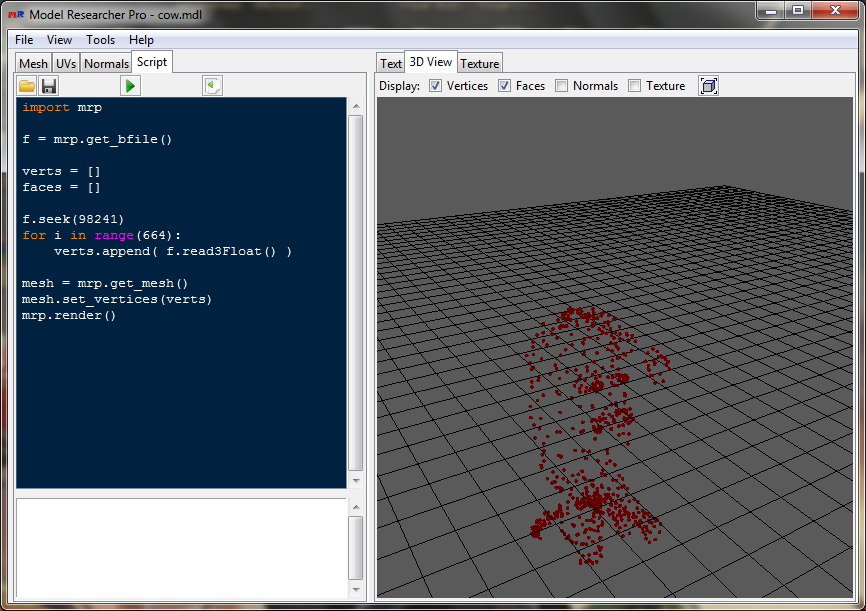
The cloud of points is built, but the figure is turned. The vertex format is "XZY", and inverting is also enabled in the z coordinate. You can convert the read vertices using the swap_vertices method. The first argument will pass the vertex format, and the second will specify which coordinates are to be inverted. After the set_vertices method, add the following line and then run the script.
mesh.swap_vertices("XZY", "z")
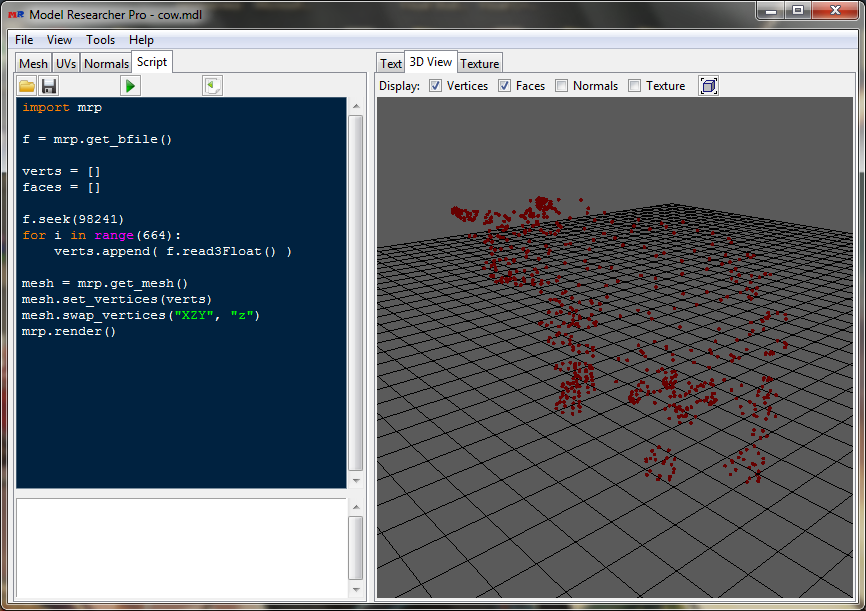
Now it is displayed correctly. You do not have to call the swap_vertices method for conversion, formatting and inverting can be set in the set_vertices method by the second and third arguments, respectively.
mesh.set_vertices(verts, "XZY", "z")
Let's move on to the faces. The face data starts with the 349 offset. The number of faces is 1288. Data type is Integer, the format is Triangles. Note the padding field: after each read face, 64 bytes should be indented.
We will also use the "for" loop to read the faces. There is a read3Int() method to read three unsigned numbers of Integer type. For the indentation after each face, we will use the seek method, passing the value 1 by the second argument, which corresponds to moving the pointer from the current position. Each read face we will add to the faces list. Write the following code after reading the vertices.
f.seek(349)
for i in range(1288):
    f1, f2, f3 = f.read3Int()
    f.seek(64, 1)
    faces.append( (f1,f2,f3) )
The last thing to do is to pass the list with the faces to the mesh and you may run the script.
mesh.set_faces(faces)
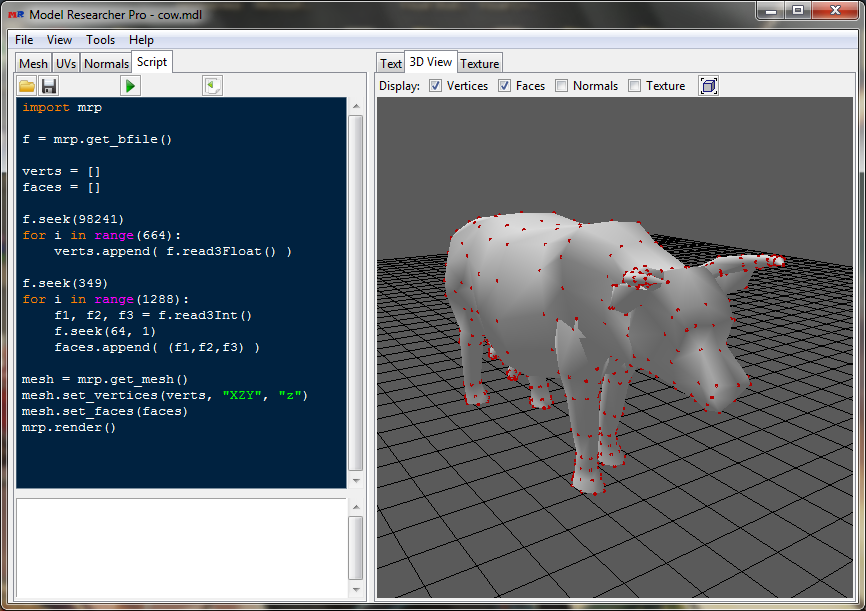
The model is built!
Now we apply the texture. For this you need to pass the texture coordinate data and their indices to the mesh (if the texture coordinate indices are not passed, then they will be the same as the vertex indices in the faces), and also set the texture material to the mesh. Let's create two more empty lists and look at the forms.
uvs = []
uvsi = []
These texture coordinates start with the 106213 offset. Their number is 702, the data type is Float. To read texture coordinates we will use the read2Float() method, which will return a tuple with two numbers.
f.seek(106213)
for i in range(702):
    uvs.append( f.read2Float() )
The indices of texture coordinates a little bit more complicated. Apart from the indentation after each three indices, there is another indentation between the indices themselves. In this case, it is better to use the reads() method. This method is implemented using the standard struct module, it takes one argument – the format in which the data will be read. Like the unpack() method of the struct module, the reads() method returns a tuple with the read data. More information about this method can be found on the page describing the API functions.
We need to read three unsigned integers of type Integer and indent 12 bytes between the values, and also indent at the end of each triple. An unsigned integer four-byte number is designated as "I", and the skip of one byte is "x". The number is specified before the type character.
f.seek(361)
for i in range(1288):
    fi = f.reads("I12xI12xI40x")
    uvsi.append(fi)
After passing the list with faces, we will specify the transfer of lists with texture coordinates and their indices.
mesh.set_uvs(uvs)
mesh.set_uvs_indices(uvsi)
The next thing you need is to create a material with a texture. To assign a texture to a material, you need to use the set_texture() method of the Material object, passing the full path to the texture image with the first argument. Using the set_material method, you can assign a material to the mesh. Note that the global material which is set by the set_material() method has a higher priority than the materials set by the set_material_faces() method.
mat = mrp.create_material("Mat")
mat.set_texture(r"D:\ModelResearcher\cow.png")
mesh.set_material(mat)
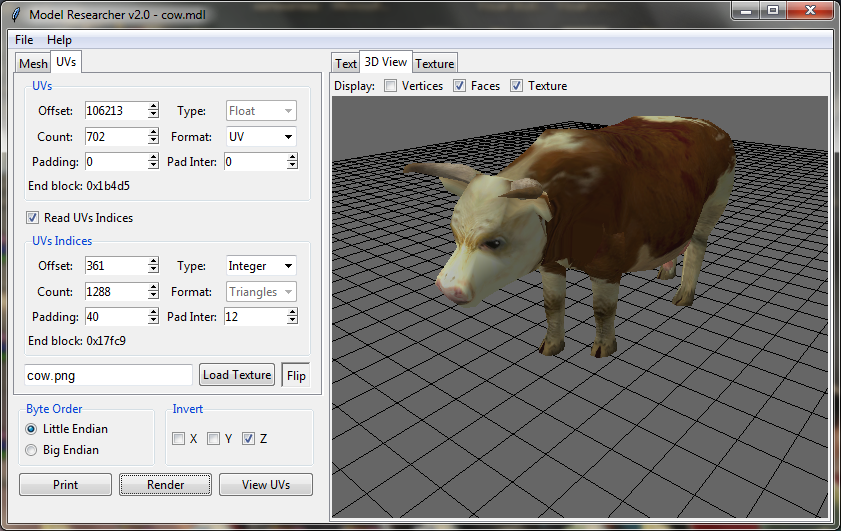
Run the script, having turned on the texture mapping.
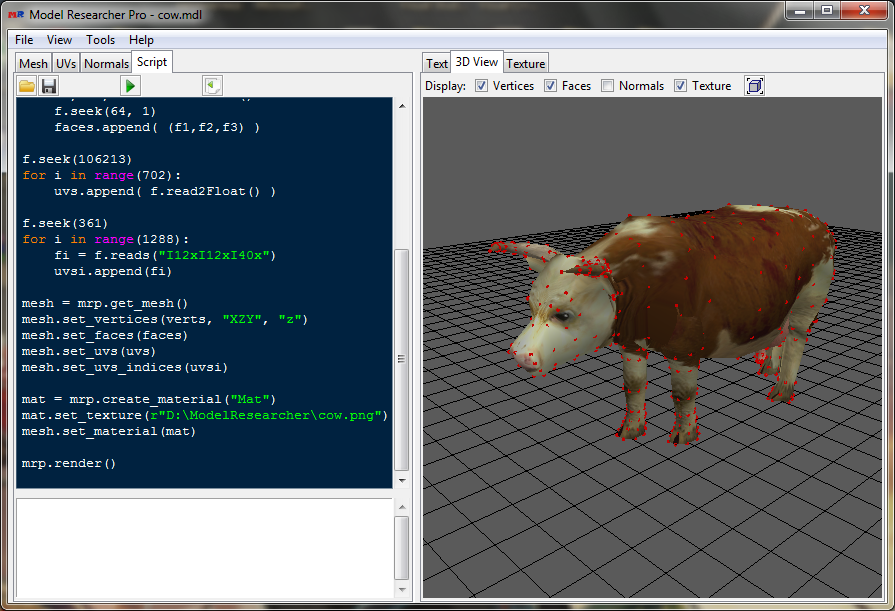
Well done, it worked! We've read the data from the file, built the model, and applied the texture. And we did all of this with the help of Python scripts. Note that no functions have been created in our script. Everything is simple and clear. Of course you can use the functions, classes, and other features of the Python language to read more complex formats. You can also combine reading the file with scripts and forms. For example, you can use forms to read vertex and face data, and use scripts to read the texture data and map the texture.
It's worth mentioning two more important functions of the mrp module. To output data in text form, there is a print_mesh() function in the Text tab, and there is a view_uvs() function to view the map of texture coordinates in the Texture tab.